If you recently became a U.S. citizen or are applying for a US passport for the first time, this article is for you! I became a U.S. citizen in 2019 and got my passport in 10 days. I am going to explain how to apply for a US passport step-by-step and share 2 mistakes I see people making that can easily be avoided if you follow all of the steps I am about to share. So, let’s dive in and get you that passport!
If this is your first time ever applying for a U.S. passport, you have to apply in person. There are 4 steps to applying for a US passport:
- Fill out form DS-11, US Passport Application
- Then, schedule an appointment at the nearest passport facility. You can schedule this appointment before you’ve filled out your form, just make sure you have everything ready before the appointment.
- Next, gather your supporting documents and payment that you have to submit with your application
- Go to your appointment
Completing Form DS-11, US Passport Application
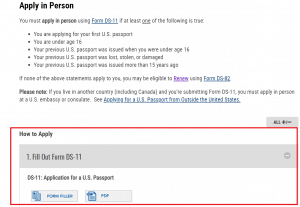
 If you recently went through the naturalization process and got a welcome packet at your oath ceremony, there is usually a passport application form inside. If you don’t have the form, you can get it here. Simply expand #1 and you’ll see the following:
You can use the “Form Filler” to fill it out on your computer and then print it. Or print out the PDF that is blank and fill it out by hand, whichever you prefer.
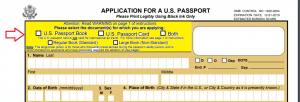
On the top of the application form, you’ll see the following:
A Passport Card is for land and sea travel, so unless you live near the border and go back and forth a lot, you really only need the passport book. If you travel a lot, I would recommend getting the passport book with extra pages. Just check “large book” instead of “regular book”. There is no extra cost for the larger passport book.
Do NOT sign the application form. It says in large letters not to do so. When you go to the post office (or whichever passport acceptance facility you choose), they will tell you when to sign it.
Schedule your appointment
Schedule an appointment at the nearest passport facility. This is usually a post office or a public library. You can type in your zip code here to see your facility options. I scheduled my appointment at the post office a couple of blocks from my home. To schedule an appointment with the post office, go here and follow the prompts on the page.
Documents to Bring
After you have completed your passport application and scheduled an appointment, gather the following documents to take to your appointment:
- Proof of U.S Citizenship
- U.S. Birth Certificate OR
- Certificate of Naturalization / Citizenship
Make sure to take the original AND a photocopy. This is the first mistake I see people making. I saw many people at the post office that had to leave and come back because they didn’t bring a photocopy and it’s just a waste of your time. So remember to bring a copy.
- Proof of identity –– a license or state ID is the easiest thing to take which most people have. It must be an in-state ID. If it’s out of state, you’ll need another form of ID as well, but your naturalization certificate should work that but just to be safe, take something else with you, such as your valid foreign passport or a global entry ID. You can find a full list of IDs here (expand #4). Again, be sure to take a photocopy of the front and back with you!
- One colored passport photo – The easiest way to get a passport photo is to go to a CVS, Duane Reade, Walgreens, FedEx, etc. near you because they understand the passport photo requirements.
NOTE: Whether you use a birth certificate or a naturalization certificate as citizenship evidence, the post office is going to keep the original and it will be mailed back to you. Now, don’t be alarmed if your passport arrives without your certificate. It is sometimes returned in two separate mailings. I got my naturalization certificate back in the mail first, then a few days later, my new U.S. passport. I really didn’t like the idea of giving my original naturalization certificate to the post office, but I got it back and people do this all the time without issues
How much does a passport cost? How long will it take?
Now, let’s talk money and timelines. This is where I see the second mistake that people make in the process.
- As of today, the department of state site says “Standard” processing time is 6-8 weeks and the “Expedited” timeline is 2-3 weeks. I paid to have mine expedited and got my passport in 10 days, which is even faster than the 2-3 weeks stated on the site. If you have an emergency and need to travel asap, there is way to get it even faster. You can learn more about that here.
- A passport book currently costs $110 and then the passport facility charges a $35 execution fee. If you choose not to expedite your passport this is all you pay ($145). I chose to expedite mine because I had travel coming up and here’s what I paid:
| Cost | Payment Method | |
| Large Passport Book | $110 | Check or Money Order |
| Expedited Processing (optional) | $60 | Check or Money Order |
| 1-2 Day Delivery (optional) | $17.13 | Check or Money Order |
| Total Payable to “Department of State” | $187.13 | 1 Check or Money Order |
| Execution Fee (Paid to Post Office) | $35 | Credit Card at Post Office (take Cash/Check as backup) |
| TOTAL | $222.13 | Paid in 2 parts |
Please note that not all passport facilities accept credit card, so it’s best to take backup payment methods.
Whether you choose to expedite it or not, your payment is broken into two parts, paid with different methods. For the $110 passport book, expedited fee and speedy delivery, you pay by check, and the $35 execution fee you pay to the post office. I was able to pay the $35 fee with credit card, but not every facility allows that. So to be safe, take $35 in cash with you as well as your check book, debit and credit cards. If you aren’t sure of the total amount for the check, just leave it blank and fill it out at the counter. I saw people leaving because they didn’t have their check books or they brought a pre-filled check with the wrong amount and did not have any other blank checks.
If you have any other questions, let us know in the comments! Happy traveling!
*The content and materials available via Ask Ellis are for informational purposes only and do not constitute legal advice.
Leave a Reply